

The fastest path through a coloring page: test your supplies on scrap paper, plan a three-color palette, block in light base layers, build midtones and shadows, blend and burnish last, then protect the finished page with a fixative. That is the full workflow. Coloring is practice, not a performance, and every page you finish teaches you something the next one benefits from. Munkterproducts' themed adult coloring books are designed with exactly this kind of relaxed, session-by-session approach in mind, and their science-backed blog post on adult coloring for stress relief explains why the process itself is the point. Burnishing, the final compression step that gives colored pencil work its polished finish, only works well when you have built up enough layers first.
Table of Contents
- What should you buy and how do you set up your workspace?
- How do you follow a step-by-step coloring workflow?
- Which colored-pencil techniques actually make a difference?
- How do you add depth with light sources and color choices?
- What mindset helps, and what mistakes should you avoid?
- How long does a page take, and what does a starter kit cost?
- How do you finish and protect a completed page?
- Munkterproducts themed coloring books are built for this workflow
- Key Takeaways
- Why themed coloring books changed how I think about this practice
- Sources and further reading
What should you buy and how do you set up your workspace?
Beginners consistently over-buy. A modest, well-chosen kit beats a 150-piece set you do not know how to use.
| Item | Why it matters | Beginner pick | What to avoid |
|---|---|---|---|
| Colored pencils | Core medium; controls blending and layering | Wax-core sets (24 colors) | Cheap crayons; no layering ability |
| Paper / coloring book | Weight affects bleed-through | 90 lb or heavier | Thin newsprint-weight pages |
| Sharpener | Tip shape changes coverage | Dual-hole hand sharpener | Electric sharpeners (waste pencil fast) |
| Blender pencil | Smooths layers without adding color | Colorless wax blender | Skipping this step entirely |
| Kneaded eraser | Lifts light pencil marks cleanly | Any art-supply brand | Vinyl erasers (too abrasive) |
Gel pens and markers add vibrancy but bleed through lighter paper, so check your book's paper weight before switching mediums. For themed adult coloring books, colored pencils are the most forgiving starting point because you can erase light marks and build color gradually.
A starter kit costs in the modest price range for pencils, a sharpener, and a blender. Upgrading to mid-range supplies with oil-based pencils and a small marker set costs more. Neither requires a dedicated art table: good overhead lighting and a hard, flat surface are enough.
Pro Tip: Before you open your coloring book, run each pencil across a scrap sheet of the same paper. This tells you how the pigment lays down and whether markers bleed through. Two minutes of testing saves a ruined page.
Beginners do best starting with simpler designs that have larger shapes, such as mandalas or basic florals, before moving to intricate scenes.
How do you follow a step-by-step coloring workflow?
A sequenced practice progression keeps beginners from skipping steps that matter. Work through these in order:
- Run test swatches. Stroke each color you plan to use onto scrap paper. Check how they look next to each other before committing.
- Plan your palette. Pick three to five colors. Choose a light, a midtone, and a dark version of your main hue, then one or two accent colors.
- Map your light source. Decide where light hits the image (top-left is a reliable default) and lightly mark shadow zones with a pencil dot so you remember them.
- Lay in base layers with light pressure. Use circular strokes to fill large areas evenly. Keep pressure at 1–2 out of 5. The goal is a thin, even coat, not full coverage.
- Build midtones. Add a second pass with slightly more pressure. Switch to cross-hatching in tighter areas where circular strokes feel cramped.
- Place shadows. Apply your darkest color in the shadow zones. Blend the edge between midtone and shadow with your midtone pencil using small circular strokes.
- Blend and smooth. Run a colorless blender pencil over the whole area. This pushes pigment into the paper tooth and softens transitions.
- Burnish last. Press firmly with a light pencil or blender over the entire section. This compresses the wax and creates a glossy, finished surface. Do this step last because burnishing makes further layering difficult.
- Check before moving on. Are shadow edges soft? Is the light source consistent? Fix any hard lines now before moving to the next section.
For a single session, focus on one section at a time rather than blocking in the whole page at once. That approach keeps color decisions manageable and lets you finish something visible within a reasonable amount of time.
Which colored-pencil techniques actually make a difference?
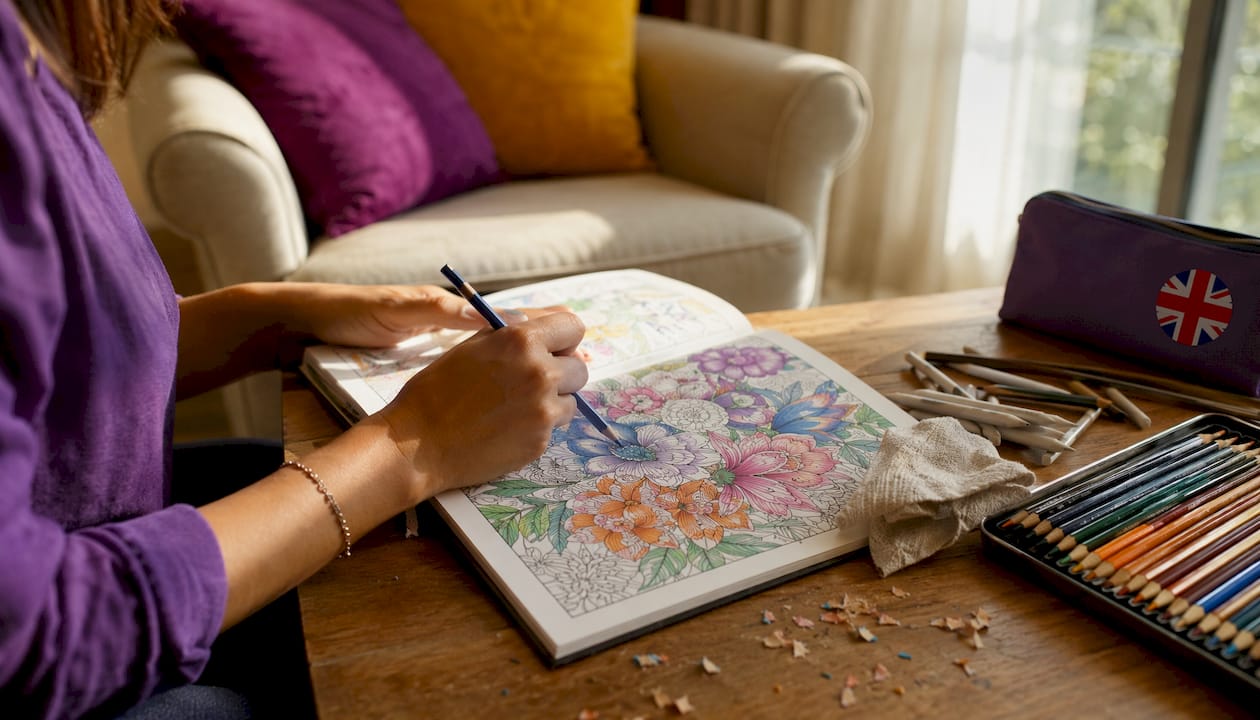
Three techniques do most of the work. Understanding what each one does physically helps you choose the right one at the right moment.
| Technique | What it does | Best use-case | Pressure |
|---|---|---|---|
| Circular strokes | Fills paper tooth evenly in all directions | Large background areas, base layers | Light (1–2) |
| Cross-hatching | Builds tone with directional lines; adds texture | Small details, tight corners, fur or fabric | Light to medium (2–3) |
| Burnishing | Compresses wax, smooths surface, adds sheen | Final finishing pass over completed layers | Heavy (4–5) |
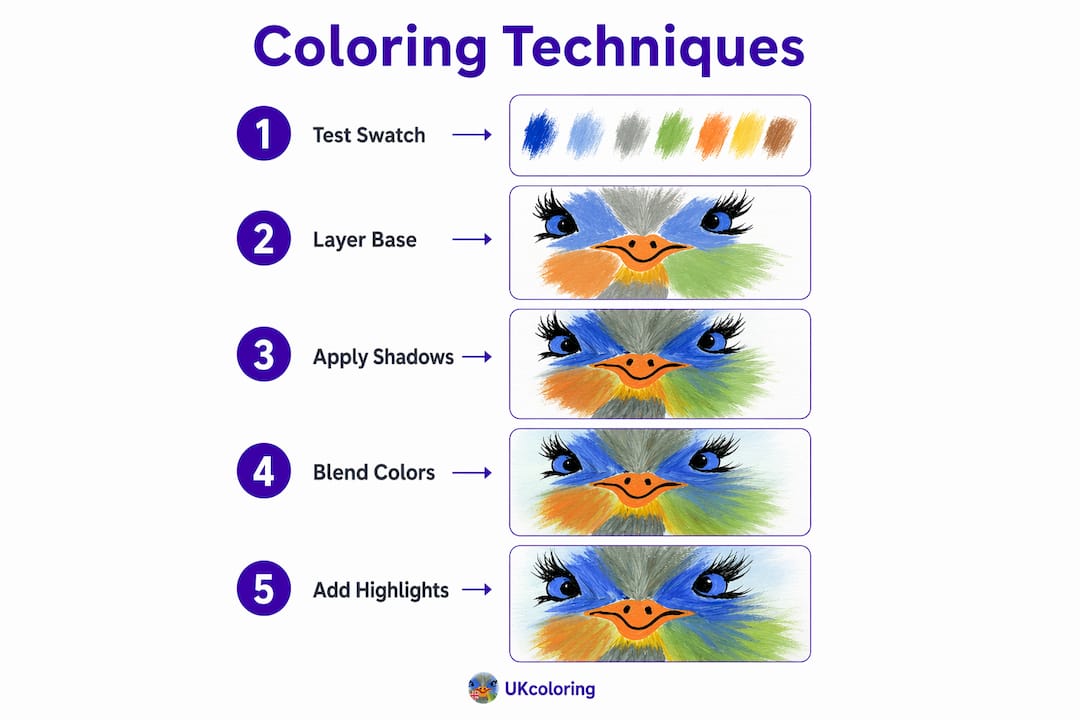
A flat fill looks exactly like what it is: one color, no depth. Add two light passes with circular strokes, blend with a colorless pencil, and burnish with a cream or white pencil, and the same area reads as dimensional. That shift comes entirely from layering and pressure control, not from buying better pencils.
Pro Tip: Practice pressure control on scrap paper using a 1-to-5 scale. Hold the pencil in an overhand grip (like holding a paintbrush) for broad fills; switch to a writing grip for fine detail. The grip change alone improves coverage consistency.
How do you add depth with light sources and color choices?
Pick one light source and never change it. Top-left is the most common default because it matches how most people read a page. Everything the light hits directly gets your lightest color. Everything facing away gets your darkest.
For shadows that look natural rather than muddy, add a cool-tinted color (blue-violet or slate blue) to your darkest layer instead of simply pressing harder with the same hue. Monochromatic value shifts work well for subtle transitions; a cool shadow accent adds the kind of depth that makes a page look finished rather than flat.
Quick palette starters by theme:
- Floral: Warm pink (light), rose (midtone), burgundy (shadow), with a blue-violet shadow accent
- Mandala: Choose one hue family (blues, for example) and use five values from pale sky to navy
- Nature/botanical: Yellow-green (light), forest green (midtone), dark teal (shadow)
Before you start coloring, sketch a tiny thumbnail of the page, mark where the light hits with an "L" and shadow zones with an "S." It takes 90 seconds and prevents the most common beginner mistake: an inconsistent light source that makes the image look flat no matter how carefully you color.
Pro Tip: Complementary colors (opposite on the color wheel, such as orange and blue) create the strongest contrast. Use them sparingly as accent colors rather than filling large areas with both, or the result reads as chaotic.
What mindset helps, and what mistakes should you avoid?
Adult coloring functions as a mindfulness practice when you focus on the process rather than the outcome. The Mayo Clinic Health System notes that mindfulness activities reduce performance pressure and increase satisfaction, and coloring fits that frame well: there is no wrong color, only choices.
Coloring works as a mindfulness tool precisely because it asks you to stay present. Each stroke is a small decision, and that steady focus is what quiets the mental noise. Read more at the Munkterproducts stress-relief blog.
Common beginner mistakes and their fixes:
- Too much pressure on the first pass. Fix: treat the first layer as a sketch, not a final coat.
- Skipping layers and going straight to dark colors. Fix: always build light to dark across at least three passes.
- Inconsistent light source. Fix: mark shadow zones before you start (see the thumbnail tip above).
- Tense grip causing shaky lines. Fix: rest your hand on a folded paper towel and take a breath every few minutes.
Imperfections are not errors. They are the texture of handmade work, and they are what make your page yours.
How long does a page take, and what does a starter kit cost?
A carefully layered 4x4 inch section generally takes about 15–25 minutes to complete, while a full detailed letter-size page can require 2–4 hours across multiple sessions.
- Simple designs with markers need a moderate total time and economical kit cost.
- Moderate detail using colored pencils takes longer and costs more for supplies.
- Complex mandalas or scenes with blending require even more time across sessions and higher-cost kits.
Markers are faster but less forgiving. Pencils take longer and reward patience with richer, more layered results.
How do you finish and protect a completed page?
Burnishing is the final move, and it is irreversible. Once you compress the wax, the paper tooth is filled and additional pigment will not adhere. Plan accordingly.
- Do sign your name on the back of the page, not the front.
- Do test any fixative spray on a scrap page first; some fixatives shift pencil colors slightly.
- Do store finished pages flat in a portfolio sleeve or acid-free folder.
- Don't press hard before your layering is complete.
- Don't frame pencil work with glass touching the paper; use a mat to create a gap.
- Don't skip a backing sheet if your book's paper is thin; it prevents bleed-through from markers onto the next page.
Pro Tip: If bleed-through has already happened, slide a sheet of cardstock behind the affected page before continuing. It will not undo the bleed, but it stops it from spreading further.
Munkterproducts themed coloring books are built for this workflow
Ready to put the workflow to use? Munkterproducts' adult coloring books are printed on paper of a weight that holds up to layering and blending, with themed designs ranging from confidence-building affirmations to playful flirtation scenes. Each book is curated for recreational coloring, meaning the designs are sized and detailed to match the session lengths described above.

Pick up a themed book, grab a 24-color pencil set, and you have everything you need to run through the full workflow tonight. Visit munkterproducts.com to browse current titles and order with postage included. Disclosure: Munkterproducts publishes and sells these coloring books directly.
Key Takeaways
A complete step-by-step adult coloring session runs from test swatches through light layering, shadow placement, blending, and a final burnishing pass that locks in the finished surface.
| Point | Details |
|---|---|
| Test before you color | Run every pencil on scrap paper to check pigment and bleed before touching the book. |
| Build light to dark | Start at pressure 1–2, add midtones, then shadows; never jump straight to dark colors. |
| One light source only | Pick top-left and mark shadow zones before you start to keep depth consistent. |
| Burnish last | Burnishing fills the paper tooth permanently; save it for the final pass over completed layers. |
| Practice drill first | A drill focusing on a 4x4 inch area (about 15–25 minutes) builds skill faster than random full-page attempts. |
| Munkterproducts books | Themed adult coloring books with paper suited to layering and blending, available at munkterproducts.com. |
Why themed coloring books changed how I think about this practice
Most coloring tutorials treat the page as a technical problem to solve. What they miss is that the theme of the book shapes the entire experience. A confidence-themed page feels different to sit with than a generic mandala, and that difference matters when you are using coloring as a way to decompress. The creative workflow you build around a book you actually care about sticks in a way that technique-first practice rarely does. Try the workflow above on a page that means something to you, then share what you made or send a question through the Munkterproducts contact page.
Sources and further reading
- Adult Coloring for Stress Relief: What the Science Says — Munkterproducts blog; science-backed context for the mindfulness framing in this guide
- How to Color with Colored Pencils — Coloring Dojo; layering, pressure, burnishing, and time estimates
- Professional Colored Pencil Techniques for Coloring Pages — Umbrella Art Studio; six-pillar skill progression
- Mandala Coloring: Easy Steps to Begin — Mariah Ajj; beginner design and theme selection
- Mayo Clinic Health System — mindfulness and therapeutic activities — primary source for the mindfulness and stress-relief framing
- Munkterproducts themed adult coloring books — purchase page for starter kits and themed titles
Test every technique on scrap paper before applying it to a finished page. The workflow above is a starting point, not a rulebook.